You can customize your Elmedia Player settings in Preferences, accessible from the main menu. The options are organized into several tabs. The following sections cover each of them in detail.
| Note: Not all options in this section are available in all Elmedia Player editions. |
General

| Note: This option is available in the Mac App Store versions only. |
Playlist:
- Autoplay files added to playlist: controls whether a file should start playing automatically when you add it to the playlist.
- Automatically add files to playlist on opening: if disabled, files you open will play without being added to the Elmedia playlist.
- Clear playlist when quitting: if enabled, files in the playlist will be cleared when quitting the app.
Playback:
- Resume playing from where playback was stopped: when enabled, your videos will start playing from the point they were stopped last time.
- Start playback at a pause: enable to prevent files from playing automatically as soon as you open them. Does not apply to playlist items.
- Control playback with media keys: allows using the F7, F8, F9 keys to control playback.
- Control playback with the Apple Remote: allows you to control playback with your Apple Remote.
Optional:
- Send anonymous usage statistics to Electronic Team, Inc.: help improve Elmedia Player by sending the information about the app usage to Electronic Team, Inc. (no personal information is collected).
- Automatically check for updates: allows Elmedia to check for updates automatically.
Quit Elmedia automatically: Defines whether the app should automatically quit upon reaching the end of a movie or playlist.
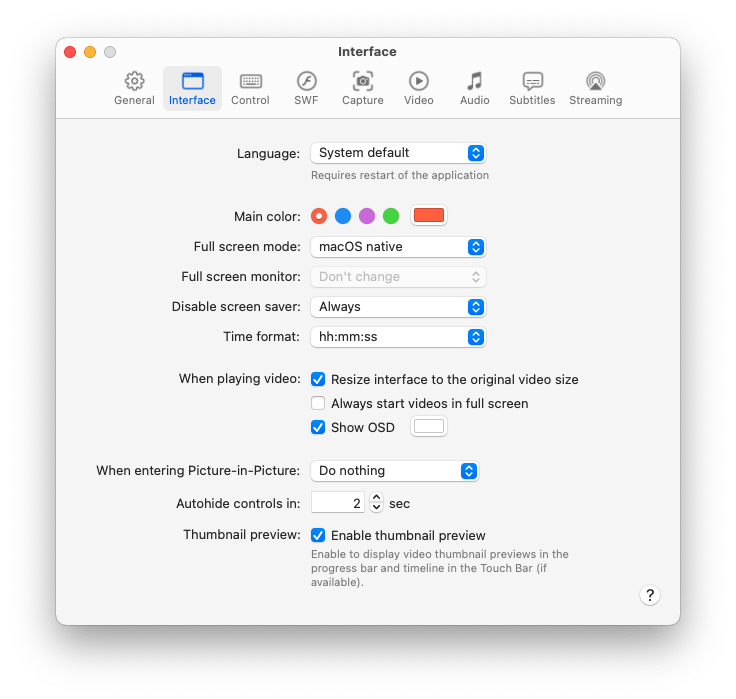
Interface

Language: choose the interface language. By default, Elmedia Player uses the language set in the System Preferences on your Mac (System Preferences > Language & Region).
| Note: To apply the changes, restart the application after setting the language. |
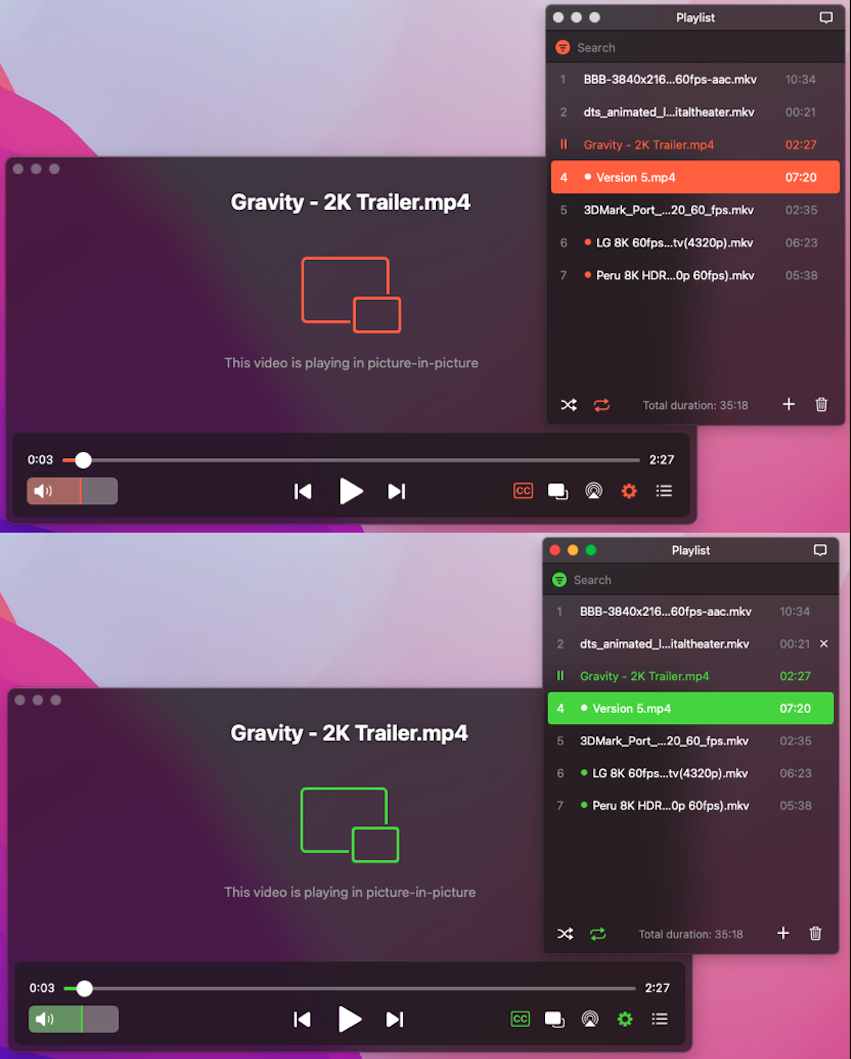
Main color: select the color theme of your player. You can choose from a palette of four predetermined colors in the free version, or customize one yourself in Elmedia Player PRO.

Full screen mode: choose between the macOS native full screen mode and the custom full screen mode which enables the multi-monitor feature (when choosing the custom full screen mode, you can also select which monitor will show fullscreen).
Full screen monitor: assign your Mac monitor for full screen videos to be displayed on it.
Disable screen saver: you can disable the screen saver during the file playback. There are 3 options:
- Never: the screen saver is never disabled;
- In full screen only: the screen saver is disabled only in fullscreen mode;
- Always: the screen saver is always disabled during the playback.
When playing video:
- Resize interface to the original video size: Elmedia Player automatically resizes to show the video at the best size.
- Always start videos in full screen: forces playback to always start in fullscreen mode.
- Show OSD: during playback, bring up the on-screen display for different events like seeking backward/forward, pausing, flipping, rotating videos, etc.
When entering picture-in-picture: choose what happens to the main window when entering the picture-in-picture mode.
Autohide controls in: set how much time should pass after mouse movement before the controls are hidden again.
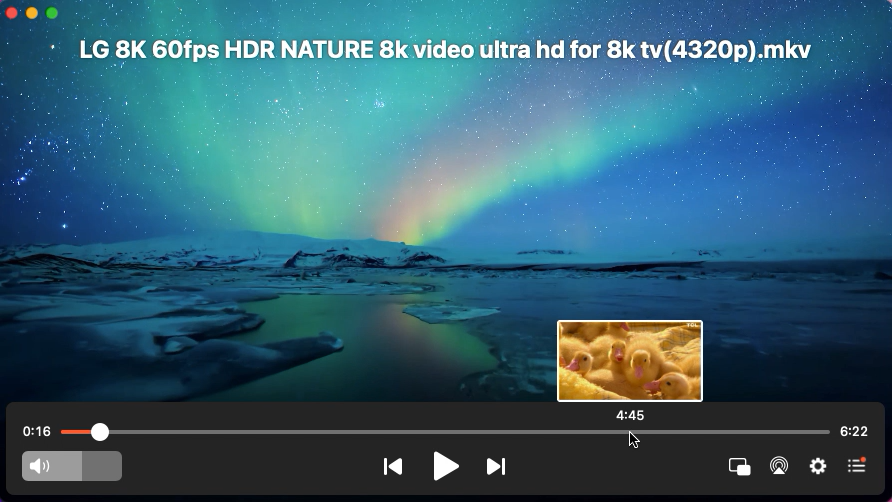
Thumbnail preview: check to see a small thumbnail of the highlighted point when you hover over the timeline. Thumbnails also show up on your Touch Bar for quick access to any part of the video.

Control

Action on double-click: choose whether a double-click pauses, toggles fullscreen, or does nothing.
Action on single-click: choose whether a single click toggles pause on the current track.
Scroll vertically to: enable or disable volume control with your trackpad.
Scroll horizontally to: enable or disable video seeking with your trackpad.
Hotkeys
In this tab, you can check the list of the default hotkeys and change them if you wish.
| Note: The standard menu item hotkeys are not included in this list as they cannot be changed. |
Reset to Defaults: allows resetting all the hotkeys to the default ones.
Change: allows changing the hotkey to the desired combination.
Clear: deletes the assigned hotkey.
SWF

Options:
- Enable Flash Local Security: Use this option to specify whether SWF content that uses older security rules can access the Internet. Using the older security system can be potentially dangerous. If you enable this option, every time an SWF file on the web or on your local computer will try to load external resources from the Internet, you will get a warning message, where you can modify security settings. For details, see: What are security settings?
- Allow to send/receive data over network: In case your Flash movie loads external data, such as texts, images, etc, it communicates with the world by sending and receiving network packets. This can be potentially unsafe since there is the possibility of arbitrary code execution. You can disable sending/receiving data over the network. However, in this case, some Flash movies may not work properly.
Note:
|
Go to the next playlist item if:
- the last frame is reached: This option allows to find out whether the current movie has been finished. Once this option is enabled, Elmedia Player proceeds to the next playlist item when the last frame of the current movie is reached.
- the frame number decreased: Elmedia Player is able to detect the last movie frame when an unexpected or unusual frame sequence happens (the movie was rewound and played from the start). Check this option if you would like to proceed to the next item in the playlist when such movie behavior occurs.
- the player stays on the same frame more than…: When you select this option, you let Elmedia Player jump to the next playlist item automatically if the movie stays on the same frame during a certain period of time. Elmedia Player gives you the possibility to set the inactivity time of the movie manually.
| Note: These options are applicable to SWF files only. |
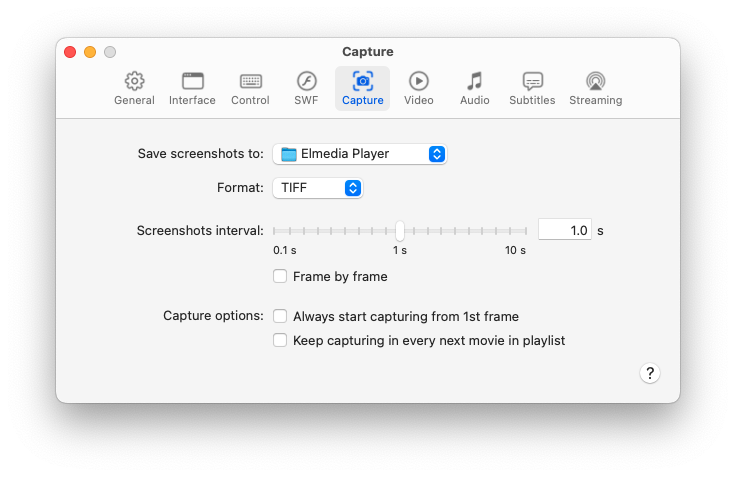
Capture

Here you can customize the options for taking screenshots:
- specify the folder where your screenshots will be saved;
- select the preferred image format (TIFF, PNG, GIF, or JPG);
- set the interval at which the screenshots will be taken, from 0.05 to 3600 sec;
- enable frame by frame screenshots capturing;
- enable the Always start capturing from 1st frame (1st sec) option if you want screenshots capturing to always start from the first frame. If you are watching a video and click Record a Series of Screenshots, playback will skip to the beginning before Elmedia starts taking screenshots;
- check Keep capturing in every next movie in playlist to tell Elmedia to continue taking screenshots for all files in the playlist.
Video

Cache size
This slider sets the cache size for videos you watch online. A relatively large cache will ensure smooth playback. However, making it too big will increase load times (because playback will not start until the cache fills up to 20%), so keep this in mind if you are on a relatively low-speed connection.
Performance
Hardware acceleration: For videos encoded with H.264 (MPEG-4 Part 10) video coding format. By default, this option is selected to improve the quality of playback, particularly the performance of full-screen playback. Hardware-accelerated scaling uses the video card on your computer to display video more clearly and quickly.
Skip frames: Check this option if you experience playback problems, for example, with high definition video. Elmedia will skip video frames to keep video and audio tracks in sync.
Audio

Number of playback channels
Set the number of playback channels for stereo equipment. Most DVDs and many other files include surround sound. Elmedia Player supports surround playback but does not enable it by default because stereo equipment is by far more common. If you have surround sound equipment it is safe to change the option "Number of playback channels" in Elmedia Player Preferences. For example, to make quadraphonic playback the default, choose 4 channels. Elmedia Player will then output audio in four channels when all four channels are available.
Automatically load external tracks
Set automatic loading of external audios: all tracks with the movie name, the same name as the movie, or all tracks in the directory.
Preferred audio language
Select the preferred language for the media with multiple audio streams. You can specify 3 languages from the drop-down lists of language options.
Passthrough for hardware decoders
Some video files can have surround audio encoded in Dolby Digital (AC-3, E-AC-3, or TrueHD) or Digital Theater Systems (DTS, DTS-HD). Some modern audio equipment is capable of decoding these formats internally. Elmedia Player can be configured to relay the audio data without decoding it. This will only work if you have a S/PDIF (Sony/Philips Digital Interface) jack in your sound card, or if you are passing audio over HDMI.
If your audio equipment can decode Dolby Digital (AC-3, E-AC-3, or TrueHD) and Digital Theater Systems (DTS, DTS-HD), you can safely enable passthrough for all of these formats. Otherwise, enable passthrough for only the format your equipment supports.
Subtitles
Appearance

This tab enables/disables the settings that change the subtitles look.
Encoding: if you see the wrong characters on the screen, try to change the subtitles encoding (default is UTF-8).
Font: change the font of subtitles.
Use embedded fonts: applies to subtitles with embedded styling; if checked, the font you specified will be overridden with that embedded in the subtitles, when available.
Chromecast Font: applies the font of subtitles when streaming them to Chromecast devices.
| Note: Chromecast devices have a limited set of fonts for subtitles. |
Size: change the size of subtitles.
Color: change the font, border, and background color of subtitles.
Apply these settings to ASS files: if checked, the predefined subtitles formatting and style of .ass files will be ignored so that Elmedia style could be applied to subtitles.
Autoload

Autoload subtitles: set here the way to automatically load the subtitles file.
Automatically enable subtitles if available: if checked, the subtitles (if available) will be automatically enabled during the video playback.
Show forced subtitles if available: forced subtitles are only used to translate languages that aren't the main language of the movie. They provide an alternative to full subtitles that transcribe the whole movie, whether in a foreign language or not. This option allows you to choose a forced subtitles track by default.
Preferred language: specify the preferred subtitle language for the media with multiple subtitle streams. You can select 3 languages from the drop-down lists of language options.
Online Search

Choose subtitle languages: select preferred languages from the lists for the subtitles search. If None is selected, the search will be performed in any language.
Search by: specify one of the search types:
- Auto. The search for subtitles is made by hash. If it didn’t give you any results, the subtitles are searched by a name of the file.
- Name. Elmedia Player uses only the filename for the subtitles search. This method allows you to get more results than the hash type but subtitles may be not applicable for a video file.
- Hash. The search by hash works with a hash key from the video and file size to search for subtitles on OpenSubtitles.com. It’s the best way to find the results you need because it remains effective even after you change the video name. But this method depends on the hash that must be accessible in the OpenSubtitles.com database.
| Note: If you have an account on OpenSubtitles.org, you need to import your account to the OpenSubtitles.com website. To do this, please visit the website and perform the "Import from OpenSubtitles.org" action there. |
Streaming
From Elmedia Player.
These settings will help you transmit audio and video files from Elmedia Player to other devices over AirPlay, DLNA or Chromecast protocols.
General

If the video/audio format is illegible, Elmedia Player will convert it into a proper format by using its transcoding feature on the fly.
Audio transcoding needs very low to moderate CPU usage on a Mac running Elmedia Player. Video transcoding (including subtitles) requires high to extreme CPU usage.
The settings below let you change the video quality and bitrate during transcoding (converting) media.
Quality
Choose the maximum resolution from the drop-down list to get the best quality for your video file.
| Note: When converting a video, Elmedia Player will never increase the original resolution of a file. |
| Tip: If you experience buffering, try lowering the video quality. If the quality is too poor (and you've got a high-end computer) try raising the bitrate. |
Bitrate
Change the video bitrate. A higher bitrate will make the image quality higher in the video output. A too high or too low bitrate can cause poor image quality or buffering.
If your bandwidth is limited, reduce both the resolution and the bitrate accordingly.
| Note: Full HD 1080p and 4K streams need significantly more encoding processing power and bandwidth. Use these resolutions only when you are sure that you have enough resources to successfully encode and send videos with no quality loss. Higher resolutions and bitrates without sufficient encoding resources or bandwidth can cause poor image quality and interrupted or corrupted viewing. |
Buffer
Set the buffer length in seconds. The minimum value is 90 seconds and the maximum is 1200 seconds. This setting allows you to optimize the streaming experience.
Buffering accumulates media segments for serving to make streaming smooth and without interruptions. The larger the buffer length you set, the more time your playback will need to start.
Tip:
|
Hardware-accelerated encoding
When enabled, a hardware-accelerated encoder will be used to convert video to H.264, which uses GPU to encode fast and improve performance. This reduces CPU usage during playback.
Downmix audio to stereo
This option allows broadcasting video with multi-channel audio to devices that do not support it.
| Tip: Enable this option if the receiving device does not support AC-3 (Dolby® Digital™), E-AC-3 (EC-3, Dolby® Digital Plus™) or DTS (Digital Theater System) audio. |
Use native playback when supported
This option lets you enable/disable the native playback of your files.
Elmedia app can play your files natively if they meet the device's native player capabilities. It means that the files should:
- be stored in a compatible file container;
- be encoded in a compatible bitrate;
- be encoded with compatible codecs;
- have a compatible resolution.
Consult the documentation for your device to make sure that it meets these requirements.
When Elmedia Player reproduces your video natively, it sends your file directly to the device without changing it. No CPU is required on a Mac to stream with Elmedia Player.
| Tip: It’s better to keep this option enabled because it improves the quality of the video image and reduces CPU usage. |
In case you disable the native playback, every media file will be transcoded. This can be useful if there are problems with video playback on particular devices.
Enable subtitles
If checked, subtitles that are stored in external files or embedded in videos will be included in playback.
Enable extraction of embedded text-based subtitles
A video file of a certain format (e.g. MKV) may have one or several embedded subtitle tracks. If checked, Elmedia Player will try to extract text-based subtitles from the video file into subtitle files and deliver them to the receiving device.
This may take a long time for large files or files on remote drives.
| Tip: Disable this option if your Smart TV supports embedded subtitles. |
Burn subtitles into video
A compatibility option for devices that don’t support subtitle tracks. The text is merged with the video and sent as a single stream.
DLNA

Some TV sets require a STOP command before playing files, otherwise, they won’t work. It’s better to uncheck this box if your TV works properly.
Use proxy server for online videos
Some DLNA/UPnP devices (e.g. Samsung Smart TV) are working in bound of a local network only. Enabling this option will help them play media from the Internet directly.
Search for devices on
If your Mac is connected to several different networks (for example, via Wi-Fi to one network, and via Ethernet to another), you need to choose the network where a search for devices should be performed.
To Elmedia Player.
The settings enable/disable streaming audio and video files to Elmedia Player over the AirPlay protocol.
AirPlay

Speaker Mode: Forces on audio-only streaming.
Broadcast Name: Allows you to customize the name by which your Mac will be identified by the AirPlay-enabled devices on your network. Check Use Computer Name option to leave the system name or type in your own.
On Connection: Let's you choose the preferred behavior of the app on connection. Elmedia Player will either connect and start the playback immediately (Connect and Play), or indicate you to accept the connection first (Request access).
AirPlay Security: Allows you to set a password that will be asked on any device attempting to connect to Elmedia Player over AirPlay.
Visit: Official Website | Elmedia Player Home Page | Download Page
